User Interface and Database Integration Using Selenium WebDriver
User Interface and Database Integration Using Selenium WebDriver

We must ensure that the data entered from the UI is consistently reflected in the database. Thus, we gave a tendency to retrieve the data from the database and verify the retrieved data against the information supplied from the UI.
Let’s start with the basic term – what is database? As we all know, every business needs an efficient and reliable method to record, update, and track data accurately. Databases are one of the foremost widely used systems to store client knowledge, inventory, or company information.
Database integration is the method used to aggregate information from multiple sources—like social media, detector data from IoT, knowledge warehouses, client transactions, and more—and share a current, clean version of it across a company. The main benefit of database integration is that it makes data accessible to multiple customers and client applications without duplicating or moving data.
In this blog, let us cover some essential factors
- JDBC (Java Database Connectivity)
- Selenium Database Connectivity
- Creation of test data in the Database
- Creation of new database
- UI-DB validation
-
-
JDBC (Java Database Connectivity) :
To start with the task, it is necessary to create a connecting bridge. JDBC is a bridge for connectivity between Java programming language and a wide range of databases. JDBC is used to execute queries and update statements to the database and retrieve the result received from the database.
Steps to create a JDBC Application
One can create a JDBC application, just follow the steps below:
- Import the packages: Include the packages that contain the JDBC classes required for database programming.
- Register the JDBC driver: We need to initialize a driver to open a communication channel with the database. Register to the database with the command: Class.forName(“com.mysql.jdbc.Driver”); // class.forName load the Driver class
- Open a connection: After the driver registration, use the getConnection() method to create a Connection object representing a physical connection with the database.
- Execute a query: Use an object of type’ Statement’ to build and submit a SQL statement to the database.
- Extract data from the result set: Use the appropriate getXXX() method.
- Clean up the environment: Explicitly close all database resources that rely on JVM garbage collection.
-
Selenium Database Connectivity :
As we all know that Selenium is the most popularly used freeware and open-source automation tool. As we all know, Selenium WebDriver is a tool to automate User Interface. We could only interact with Browser using Selenium WebDriver.
Database testing using Selenium
- Create a database in command prompt and insert the tables into it.
- Establish a connection to the database using JDBC.
- Execute the MySQL queries and process records present in the database.
- Integrate TestNG with JDBC to perform Database Testing.
Below are the few syntaxes used while Database testing using Selenium
- For Connection objectSYNTAX: static Connection con = null;
- For creating Statement objectSYNTAX: private static Statement stmt;
- For Constant for Database URLSYNTAX: public static String DB_URL = “jdbc:mysql://localhost/Testdata”;
- Database UsernameSYNTAX: public static String DB_USER = “your_user”;
- Database PasswordSYNTAX: public static String DB_PASSWORD = “your_password”;
- Database connectionSYNTAX: String dbClass = “com.mysql.cj.jdbc.Driver”;
Class.forName(dbClass).newInstance();
- Get connection to DBSYNTAX: Connection con = DriverManager.getConnection(DB_URL, DB_USER, DB_PASSWORD);
- Statement object to send the SQL statement to the DatabaseSYNTAX: stmt = con.createStatement();
- Close DB connectionSYNTAX:
if (con != null)
{
con.close();
}
-
Creation of test data in the Database :
For the creation of the database, we need to download the MySQL database. It can be downloaded from https://dev.mysql.com/downloads/
One also needs to download the jar files from http://www.java2s.com/Code/Jar/c/Downloadcommysqljdbc515jar.htm
Add the downloaded jar file to your project. Right click on your Java File – Click on Build Path – Configure build path – Select the libraries – Click on add external JARs – Select MySQL JDBC jar – Click on open to add it to the project
-
Creation of New Database:
Once the MySQL is installed you are ready for creating the new DB. Below are the steps to create the DB using MySQL Workbench
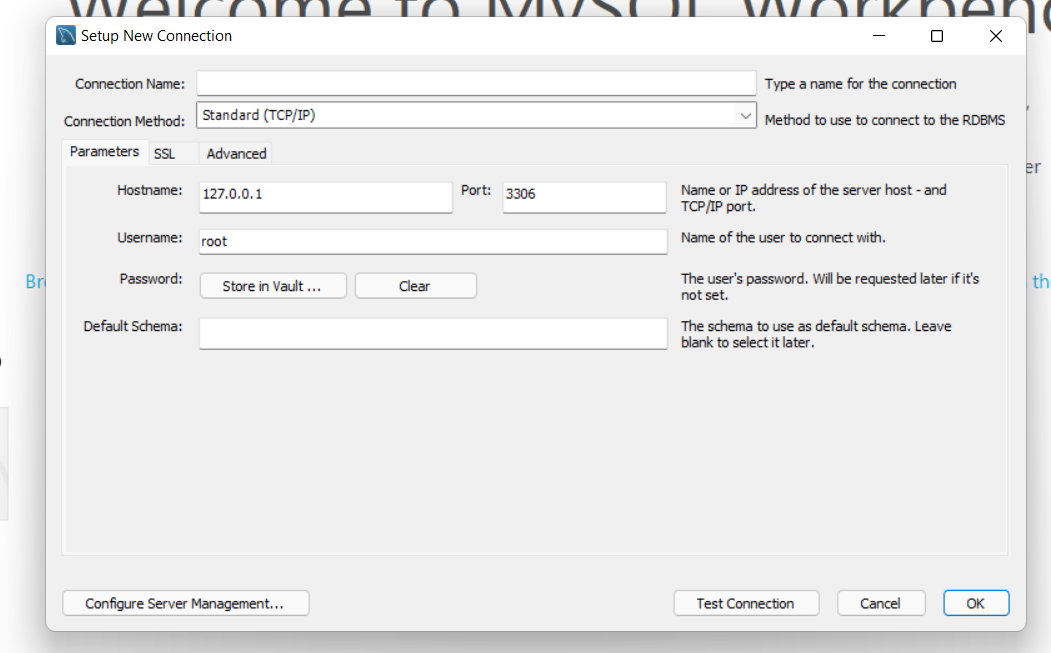
- First, launch the MySQL Workbench and click the setup new connection button as shown in the following screenshot:

- Type the name for the connection and click the Test Connection button.
- Click on File>Create Schema to create the database schema.
- Enter a name for the schema and click Apply.
- In the Apply SQL Script to Database window, click Apply to run the SQL command that creates the schema.
- Click Finish. You can see the new schema, which has no tables, listed in the left pane.
- One can also create the database from command-line. Create the database: create database DB_NAME;
- First, launch the MySQL Workbench and click the setup new connection button as shown in the following screenshot:
-
User Interface-Database validation:
Let’s face a scenario where we have to fetch the data from the UI application and validate that the data displayed on the UI page matches the data stored in the database table. After making any action in the web application, we can check the database to see if all the details we submitted are stored correctly. For example, when creating an account, we will input some data mobile number, email Id or username etc. To ensure an account is created, we can check record created in database with all the details such as mobile number, email Id or username provided by user. After performing any action, we may want to check the data displayed in the UI is correct by comparing the database.
-
